Studio Setup
Jump to Physical | Lighting | Camera
The basic shot for Bruce's Short is a Body shot against a saturated white background. This is made slightly more difficult than usual because Bruce will usually be wearing a white lab coat that needs to be correctly exposed.
- The studio should be set up for a 3/4 shot with an infinite white background and at least 2 stops of over-exposure on the background to allow for Bruce wearing a white lab coat. This can be achieved with a white background or with chroma-key.
- A Teleprompter is needed with either a speed control or someone to edit the speed and spacing of the words because Bruce won't remember his lines.
- Preferred shooting format is 1080p50 at around 100Mbps or better.
- Audio can be mono or stereo.
- You are aiming for crushed white background with the entire lab coat visible.
Something like this: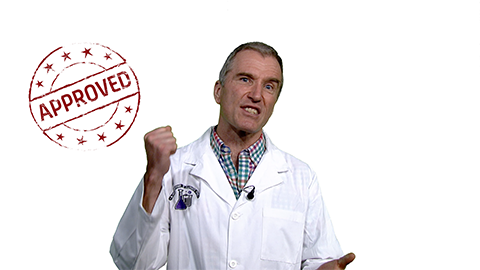
Physical Setup
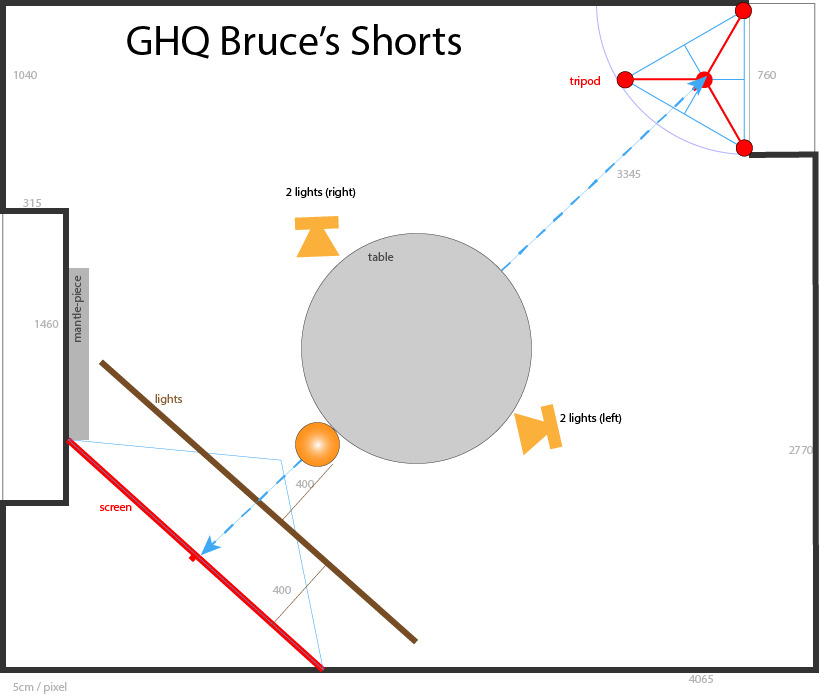
Different studios will be arrange slightly differently. The basic setup for the small home studio is given above.
- Equipment:
- Position screen in corner of mantle piece.
- Position lighting rig parallel to screen at 400mm.
- Position tripod in door and set to maximum height.
- Position table on centre line with edge at 900mm from screen.
- Position actor lights either side of table (one at max height, one at eyeline).
- Lighting:
- Adjust all lighting rig lights to max color temp & max brightness.
- Adjust actor lights to just above minimum setting.
- Vignetting:
- Check viewfinder for black / dark corners - adjust camera / lights.
- Exposure:
- Turn on 95% zebra ensure background blown out but not lab coat.
- Sound:
- Ensure stereo being received.
- Shot review:
- Shoot 10s clip and load into premiere.
Lighting setup for GHQ
- Set up lighting as previously stated
- Turn off all lights on Bruce so that just the background lights remain.
- Take a light meter reading of the background
- Remember to take all your light readings at the same distance away from the subject each time in order to get an accurate result for comparison.
- This should be about 100.
- Take the second light meter reading
- Turn off all background lights and turn on just those aimed at Bruce.
- The second reading should be between 25-50 (lower enables easier edit).
- Ensure the lighting is even on Bruce's face and jacket
- Turn these lights down from max brightness, around halfway is best.
- Turn on all lighting and check you're happy with the camera display.
- Remember to turn off lights when not in use in order to conserve battery.
Basic setup for A7s2
The goal is for the b/g to be 2 stops over-exposed
- Lens
- 85mm f1.8 (SEL85F18)
- switch focus to
MF
** Audio
- Rode Film maker Rx - red jack - ??? dB
- Rode Film maker Tx - Lavalier - ??? dB
- Dials:
Moviemode- +/-
0exposure AF/MF- Connect Power & micro-HDMI
- Menu > Camera > 7 > Manual mode > Movie/HFR >
Manual Movie - If camera turned on in PAL mode then change to
NTSC- Menu > Toolbox > 3 >
NTSC mode - Camera reboots - you may need to format the memory card
- Menu > Toolbox > 3 >
- ** Menu**
- 1 Camera
- Image Size
L:10M - Aspect Ratio
16:9 - Quality
Fine - RAW File Type
Compressed - Panorama: Size
- - Panorama: Direction
-
- Image Size
- 2 Camera
- File Format
XAVC S HD - Record Setting
24p 50M - Dual Video REC:
Off - HFR Settings
- Drive Mode
Single Shooting - Bracket Settings > Self Timer During Brkt
Off - Bracket Settings > Bracket Order
0 > - > +
- File Format
- 3 Camera
- Flash mode
Flash Off - Flash Comp
0 - Red Eye Reduction
Off
*Focus Mode
Manual Focus- Focus Area
Flexible Spot
- Flash mode
- 4 Camera
- Focus Settings
- AF Illuminator
Auto - Exposure Comp
0 - Exposure Step
0.3EV - ISO
500 - ISO Auto Min SS
Standard
- 5 Camera
- Metering Mode
Center - White Balance
Auto - DRO/Auto HDR
Off`` - Creative Style
Vivid - Picture Effect
Off - Picture Profile
Off - Black Level
0
- Metering Mode
- 6 Camera
- Zoom
- - Focus Magnifier ``
- Long Exposure NR
Off - High ISO NR
Normal - Center Lock-on AF
Off - Smile/Face Detect
Off
- Zoom
- 7 Camera
- Soft Skin Effect
Off - Auto Obj Framing
Off - Auto Mode
- - Scene Selection
- - Movie/HFR
Manual Exposure
- Soft Skin Effect
- 8 Camera
- Steady Shot
Off - Steady Shot Settings
- - Colour Space
sRGB - Auto Slow Shutter
Off - Audio Recording
On - Audio Rec Level
11
- Steady Shot
- 9 Camera
- Audio Out Timing
Live - Wind Noise Reduct
Off - Memory Recall
- Memory > save to M1
- Audio Out Timing
- 1 Cog
- Zebra
95 - MF Assist
On - Focus Magnif Time
No Limit - Grid Lines
Rule of 3rds - Marker Display
On - Marker settings
- Center
On - Aspect
Off - Safety Zone
80% - Guideframe
On
- Center
- Zebra
- 2 Cog
- Audio Level Display
On - Auto Review
2s - Disp Button
Monitor - All On - Peaking Level
High - Peaking Color
Yellow - Exposure Ste Guide
On
- Audio Level Display
- 3 Cog
- Live View Display
Setting Effect On - AF Area Auto Clear
Off - Pre-AF
On - Zoom Setting
Optical Zoom Only - Finder / Monitor
Auto
- 1 Camera
HDR setup for A7s2
Put into Manual mode, press menu and do an SLOG3 setup as follows:
Ensure that you over-expose by at least 2 stops!!
Camera icon Settings:
- Camera
- Image Size
L:12M - Aspect Ratio **3:2`
- Quality
Fine - RAW File Type
Compressed
- Image Size
- Camera
- File Format
XAVC S HD - Record Setting
50p 50M
- File Format
- Camera
- n/a
- Camera
- AF Illuminator
Auto - ISO
500
- AF Illuminator
- Camera
- Metering Mode
Center - White Balance
Auto - Picture Effect
Off - Picture Profile
PP8- Black Level
0 - Gamma
S-Log3 - Black Gamma:
- Range
Middle - Level
0
- Range
- Knee:
- Mode
Auto - Auto Set
- Max Point
100% - Sensitivity
Mid
- Max Point
- Colour Mode
S-Gamut3.Cine - Saturation
0 - Colour Phase
0 - Colour Depth
0for all components
- Mode
- Detail:
- Level
-7 - Adjust:
- Mode
Auto - V/H Balance
0 - B/W Balance
Type3 - Limit
7 - Crispening
0 - Hi-Light Detail
0
- Level
- Black Level
- Metering Mode
- Camera
- High ISO NR
Normal - Center Lock-on AF
On - Smile?Face Detect
Off
- High ISO NR
- Camera
- n/a
- Camera
- Steady Shot
Off - Colour Space
sRGB - Auto Slow Shutter
Off - Audio Recording
On
- Steady Shot
- Camera
- Audio Out Timing
Live - Wind Noise Reduct
Off
- Audio Out Timing
Cog icon Settings:
- Cog
- Zebra
95 - MF Assist
On - Focus Magnif Time
No Limit - Grid Lines
Rule of 3rds - Marker Display
On - Marker settings
- Center
On - Aspect
Off - Safety Zone
80% - Guideframe
On
- Center
- Zebra
- Cog
- Audio Level Display
On - Auto Review
2s - Disp Button
Monitor - All On - Peaking Level
High - Peaking Color
Yellow - Exposure Ste Guide
On
- Audio Level Display
- Cog
- Live View Display
Setting Effect On - AF Area Auto Clear
Off - Pre-AF
On - Zoom Setting
Optical Zoom Only - Finder / Monitor
Auto
- Live View Display
